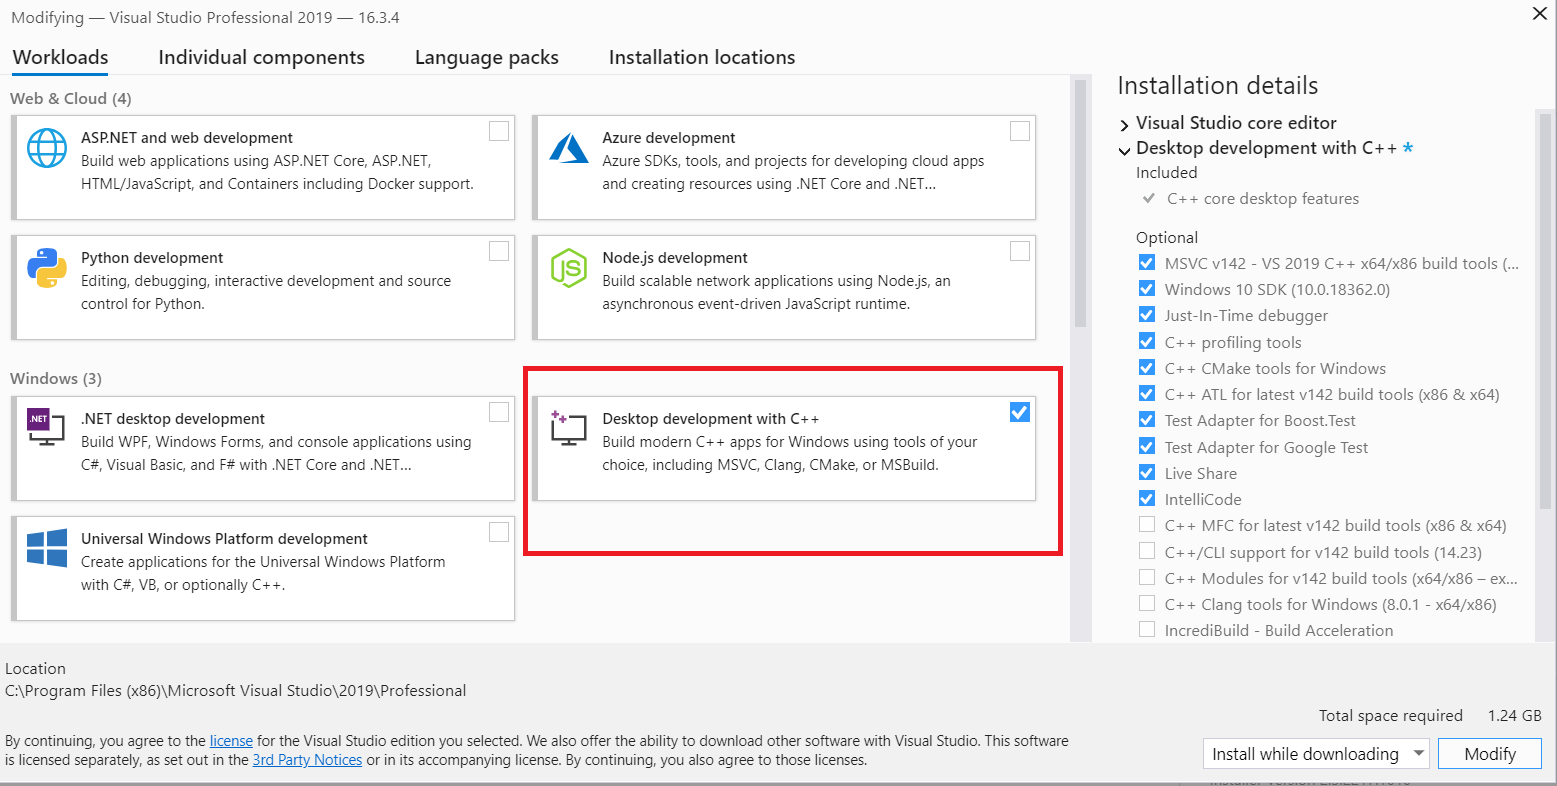
Okay first things first, download Visual Studio 2019 installer. This is the link I used to download it, going to Microsoft's website and downloading it is not going to be straightforward. After opening the installer it looks like this.
Uncheck everything. Yes, do it and check Desktop Development with C++ because that's what we're going to need to compile the engine. On the left side where the Installation Details is, uncheck Test Adapter for Boost Test and Test Adapter for Google Test. We don't really need them. Installations can take a while depending on your internet's speed and computer specs.
After the installation has been completed, Open Visual Studio. To make sure everything is working, we need some smol c++ code.
#include <windows.h>
#include <iostream>
int main()
{
	std::cout<<"BGENinja\n";
	return 0;
}
If it worked, you are good to go! If not open up the VSInstaller uncheck and check Desktop Development with C++, click on "Modify". It must be working. Now you need to install CMake for making a .sln file.
A solution is a structure for organizing projects in Visual Studio. The solution maintains the state information for projects in two files:
Go to cmake.org and download the latest CMake version. When installing it, you may be asked with some options like below.

As highlighted, it is recommended to add it to PATH for all users.
PATH is an environment variable on Unix-like operating systems, DOS, OS/2, and Microsoft Windows, specifying a set of directories where executable programs are located. In general, each executing process or user session has its own PATH setting.
After installing CMake, we need libraries to compile them. Thankfully the UPBGE developers has linked them. Go to mega.nz, look for win64_vc14 and download it. The size is 2GB. After downloading the libraries, we need to create folders for UPBGE builds to keep them organized.
Create a folder named "upbge" and put the
source code there, we dont really need this folder that much,
just to keep them neat.
And then for the libraries open the downloaded library
.zip file and extract it named as lib.
Now you must be having two folders namely
upbge and lib.
Open CMake (cmake-gui), select where your UPBGE source code is
and where you want the binaries to be built.
there, we dont really need this folder that much,
just to keep them neat.
And then for the libraries open the downloaded library
.zip file and extract it named as lib.
Now you must be having two folders namely
upbge and lib.
Open CMake (cmake-gui), select where your UPBGE source code is
and where you want the binaries to be built.

After choosing the folders, click on configure. If you have specified a folder that doesn't exit, it may ask if you want to create one. Then specify the generator for our project which is Visual Studio 16 2019. Now CMake will be making the solution project and wait until it finishes, takes under 5 min. Then click generate, it will be generating the .sln file for you and after 2 min its done.
Now go to "upbge" folder and you'll find bunch of files, but only one .sln file, which is UPBGE.sln if you've downloaded 2.5b and UPBGE2.x.sln if 2.6+. Open Visual Studio, drag the file and open it and there is where you can edit source code of UPBGE
Finally to compile it, make sure CMakePredefinedTargets is selected, go to Build -> Build -> 2 INSTALL. Now it must be compiling.
If you're building UPBGE for the first time, it may take upto 1-2 hours. After you build them, Visual Studio only compiles to file you have made changes to and leaves the rest as it is after the first time.
After compiling, go to folder where the solution file is located, goto bin -> Release and there is your blender.exe!